Week 20: We Have a Roof…plus More Ceiling Details!

Joel was waiting so long for this day to finally come…with the rainy weather beginning, all I kept hearing from him is how he doesn’t like that the house is getting wet with water puddling up on the concrete downstairs and the plywood subfloor upstairs.  “That can’t be good for it,” he’d say.  But the wait is over!  We have a roof!!  Last Friday they had all of the material up on the roof and on Monday morning they began.  And now at the end of the week, they’re about 95% done.  Still need to finish up some roof vents and the well house and I think it’s finished.  Ya-hoo!!

The roof is on!

The roof is on!

Here's a closer picture of the front entry.

Here’s a closer picture of the front entry.

Half-way through the week, here's what the back of the house looks like (from standing WAY back at the well house).

Half-way through the week, here’s what the back of the house looks like (from standing WAY back at the well house).

Oh yeah, and they built the well house today! Isn't it cute?

Oh yeah, and they built the well house today! Isn’t it cute?  The boys haven’t seen it yet, but when they do, I bet they’re going to wish it were their play house!

And, even better than the roof (although probably not for Joel) is that they worked on the great room ceiling and the kitchen ceiling!  We had them lower the great room ceiling and not only was that done, but the locations for where the faux beams are going to be in there were placed.  And the locations of the coffered ceiling in the kitchen was done too!   I LOVE them!!  The placement in the rooms looks so great and I can’t wait for the beams to be fully built, but for now, just seeing where they’ll go is ultra exciting!

The small entry has a tray ceiling.

The small entry has a tray ceiling.

The great room ceiling was lowered to a more comfortable height, and the faux beams were added. LOVE!!!

The great room ceiling was lowered to a more comfortable height, and the faux beams were added. LOVE!!!

On the left side of the room, the 'beams' align with the fireplace and built-ins.

On the left side of the room, the ‘beams’ align with the fireplace and built-ins.

And on the right side of the room, the 'beams' flow directly into the kitchen's coffered ceiling.

And on the right side of the room, the ‘beams’ flow directly into the kitchen’s coffered ceiling.

The coffered ceiling in the kitchen looks AMAZING!

The coffered ceiling in the kitchen looks AMAZING!

And they also continued to work on the plumbing this week (not so exciting, but I guess it’s still important) 🙂  We also worked to figure out the locations for the HVAC cold air returns and soffits in the basement.

And the plumbing continued on the house!

And the plumbing continued on the house!

Week 19: Ceiling Details, Cabinetry Walkthrough & Plumbing

This week a few really fun details were built in with the framing.  To begin with, the front entry way and dining windows were finally done.  The arches that they added really make the front area look finished.  There’s an arch over the front porch, as well as an arched window over the front door.  The arch over the front porch is a bit higher than the window over the door so that when you’re standing back at street level, you can see both of them.

By the end of the week, the arches have been added at the front of the house, and the roofing has been delivered and is ready to be installed.

By the end of the week, the arches have been added at the front of the house, and the roofing has been delivered and is ready to be installed.

The entryway windows have been framed.

The entryway windows have been framed.

The front arches were added to the porch, entry door and dining windows this week.

The front arches were added to the porch, entry door and dining windows this week.

The dining room window was also framed in this week.  At first it was a big shock because it had been open for so long it sort of took me by surprise not to see one big giant window in that room!  But it looks fantastic, and after making all the design changes to get this window and the dimensions ‘just right’ – I think it turned out fabulously.

The dining window was framed this week - It'll have three windows that open, then transoms, then an arched window.

The dining window was framed this week – It’ll have three windows that open, then transoms, then an arched window.

On the inside of the house, a few of my favorite details were built.  First to finish up the dining room, the tray ceiling was completed, and the beginning of the “X” within the tray was added.  Love it!  And notice how the arched window will leave just enough room for trim above it…I think it’ll look great once it’s all finished.

The tray ceiling and "X" pattern on the ceiling were constructed.

The tray ceiling and “X” pattern on the ceiling were constructed.

The windows in the dining room look SO GOOD!

The windows in the dining room look SO GOOD!

And the tray ceiling was also added in the master bedroom as well.  All of the tray ceilings in the house are 18″ from the walls, and 10″ tall.

The tray ceiling in the master was added this week.

The tray ceiling in the master was added.

The fireplace framing was built this week - we'll have a bench under the the fireplace, so it's raised up off the floor.

The fireplace framing was built this week – we’ll have a bench under the the fireplace, so it’s raised up off the floor.

The staircase is located back behind the fireplace, and the curvature in the staircase was finished up this week.

The staircase is located back behind the fireplace, and the curvature in the staircase was finished up this week.

Cameron came with me after soccer practice on Wednesday night to check out some of the progress which included some other areas in the house that he had fun seeing…

First stop was checking out he built-in bench in the office. Eventually bookshelves will line the wall to the right, and this will be such a fun spot to read with the boys - plenty deep and big enough!

First stop was checking out he built-in bench in the office. Eventually bookshelves will line the wall to the right, and this will be such a fun spot to read with the boys – plenty deep and big enough!

Cam's next stop was the master shower. He got such a kick that the drain hole was cut and he could see right into Spencer's bedroom underneath. He's waiving "hi" to Spencer in this pic!

Cam’s next stop was the master shower. He got such a kick that the drain hole was cut and he could see right into Spencer’s bedroom underneath. He’s waiving “hi” to Spencer in this pic!

Cam's last stop was his bathroom. We contemplated rearranging this room, but he really liked that his vanity would be separated from Spencer's so we decided to keep it the way it is now. He's already pretending to brush his teeth at the sink!

Cam’s last stop was his bathroom. We contemplated rearranging this room, but he really liked that his vanity would be separated from Spencer’s so we decided to keep it the way it is now. He’s already pretending to brush his teeth at the sink!

On Tuesday morning, my mom and I met with Matt and the rep from Canyon Creek Cabinets to walk through the house and discuss the different cabinet layouts.  It was a lot of fun to discuss my different ideas as well as get feedback from the rep and what he thought we should do.  Now he has to go back and lay things out for us to approve.  That’ll be exciting to see those once they’re done.

The plumbers started this week, so we really had to nail down all of the sink locations.  The only ones that were really in question were the boys’ bathroom sinks and the prep island sink.  The boys’ bathroom has a pretty decent sized linen closet in there – for all of their towels, sheets, and swim gear.  The design was to have the linen closet separating each of the boys’ sink vanities so that they could each have their own ‘space’.  The closet takes up quite a bit of space, and I was worried that it makes the space feel a little cramped.  So we discussed rearranging the room.  In the end, we decided to make the closet a couple inches less deep so that it didn’t protrude into the room as far and keep the vanities separate.  Cameron really liked that, and I think it’ll be nice for the boys to have really great storage solutions in there.

Plumbing started this week! Here's a picture in the kitchen where the sink and fridge will go.

Plumbing started this week! Here’s a picture in the kitchen where the sink and fridge will go.

On Saturday, Joel and I went to check things out at the house and we decided to rearrange things a bit in the mudroom.  We’re going to put the boys’ bench and shoe cubbies to underneath the window and get a narrower desk for where their cubbies used to be.  This should give them more space to put their shoes and all of the bags they bring home from school and practices.

Back up in the first picture, you can see that roofing supplies were delivered and they’ll be starting on that next week!

Week 16: Roof Sheathing & Well House Foundation

This week the framers were at the house and primarily focused on sheathing the roof.  Sheathing is when the put the plywood on top of the trusses – this creates the structure for the roof to be installed on.  Joel and I swung by on Thursday early afternoon to see the progress on our way out to Suncadia for a quick getaway with Joel’s work.  They had quite a bit of the sheathing already installed and although it doesn’t look like much was really ‘built’…it’s amazing how adding the roof really makes it feel like rooms.

A glimpse of the progress on Thursday morning.

A glimpse of the progress on Thursday morning.  I’m still not sure when they’ll put the gable on the front of the garage. I would have thought it would have been more logical to build that first and then put up the sheathing.  But what do I know about building houses!?

Quite a bit of the roof sheathing went on this week.

Quite a bit of the roof sheathing went on this week.  The space at ridge of the roof will be where our ridge vents will be located.

We dropped by the house on the way home from our weekend getaway on Sunday and quite a bit more work was done on it…they even started the gable on the garage!

We stopped by the house on the way back from Suncadia on Sunday and they definitely got a lot more done!

We stopped by the house on the way back from Suncadia on Sunday and they definitely got a lot more done!

They even started on the gable on top of the garage!

They even started on the gable on top of the garage!

This will be our office, which will have a vaulted ceiling.

This will be our office, which will have a vaulted ceiling.

The dormers above the window in the master closet and the laundry room haven't been started yet.

The shed dormers above the windows in the master closet (shown in pic) and the laundry room haven’t been started yet.

Cameron checked out the house with us this time, and liked the sawhorses!

Cameron checked out the house with us this time, and liked the set of sawhorses!

The back of the house still needs some sheathing, but it's coming along!

The back of the house still needs some of the roof sheathing, but it’s coming along!

Now it's really easy to see the covered bbq area outside of the kitchen.

Now it’s really easy to see the shape of the covered bbq area outside of the kitchen.

Here's what the house looks like from the front as you'd drive up to it.

Here’s what the house looks like from the front as you’d drive up to it.

Also on Thursday they poured the slab for the well house.  Sheds are allowed to be built to a size of 200 square feet without needing to be permitted through King County.  We ended up building a shed that’s 12′ x 12′ so 144 square feet.  I contemplated building it as big as we could, but Matt convinced me that 12′ x 12′ is definitely big enough to hold everything we we want to and it won’t look huge and out of place.  So…what do we need a well house for?  We will have water storage tanks that will store water as it comes out of the well.  I think the intent is to have 2 large storage tanks.  One for water that we use in the house (potable water) that we’ll end up treating for water quality.  And the other tank will store water that will serve two purposes – the lawn sprinkler system and our house fire sprinklers.  We’re required to have fire sprinklers at our house because King County requires that the fire department needs to be able to reach all exterior walls of the house by walking 150′ around the house.  Unfortunately, with the shape of our house, and how it sits on the property you can’t walk 150′ around both sides of the house and cover the entire back of the house.  So we’re required to put in fire sprinklers.  One good thing is that it’s safer for us – after building and spending so much time on the house, at least if there’s a fire I know that it’ll be put out instantly – or at least delay our house from burning down until the fire department could reach us 🙂  Plus, I think we’ll end up getting lower insurance rates too!

The foundation for the well house was poured this week.

The foundation for the well house was poured this week – a little hard to see, but it’s way down there and actually there’s a guy down there finishing the concrete surface!

Up close pic of the well house foundation slab.

Up close pic of the well house foundation slab.

Week 14: Plumbing Fixtures & a tiny bit of Framing

This week was pretty slow at the build.  Last week I mentioned that the framers had to work on another job that they committed to prior to ours – so they were there all week.  As it turns out though, a few of their guys actually snuck away to work on our house on Thursday and Friday.  We visited the house this weekend and it didn’t look like much had changed except for a few more ‘barge boards’ were up on the front of the house.  That was, until you actually went inside and then we noticed that the roof was put on the mudroom. This is the transition area that turns the house 45 degrees.  As such, it looks like it took some time to build, and a bit trickier than the other areas of the house.

Here's the progress from this week's work. Not too much changed from last week.

Here’s the progress from this week’s work. Not too much changed from last week.

The temporary construction ramp leads up to the mudroom door. The roof framing above the mudroom is what the guys worked on the couple of days that they were at our house this week.

The temporary construction ramp leads up to the mudroom door. The roof framing above the mudroom is what the guys worked on the couple of days that they were at our house this week.

Here's what the framing looks like from inside the room!

Here’s what the framing looks like from inside the room!

Beside that, the guys also worked on a small area of the back deck which connects the mudroom to the outdoor BBQ area near the kitchen.  Joel and I debated for a while over how much of the back deck should be covered.  We ended up only covering a small spot for Joel to put his BBQ.  The house that we’re renting now has a great covered BBQ area, so that’s now a must on our list.

The crew built a little part of the deck this week that has the covered BBQ area.

The crew built a little part of the deck this week that has the covered BBQ area.

This is a straight-on look at the covered BBQ area. It's right outside of the back door to the kitchen so it will be super close and handy!

This is a straight-on look at the covered BBQ area. It’s right outside of the back door to the kitchen so it will be super close and handy!

Here's the little trusses they used to frame the BBQ area.

Here’s the little trusses they used to frame the BBQ area.

This wall is missing a door - there should be one between the two windows (will get fixed later). That will be the back door from the mudroom which has a bit of a covered porch off the back to let our dog Bella out.

This wall is missing a door – there should be one between the two windows (will get fixed later). That will be the back door from the mudroom which has a bit of a covered porch off the back to let our dog Bella out.

Check out the new view from the kitchen windows - you can see the roof line from behind the mudroom (on the right) and the BBQ area (on the left).

Check out the new view from the kitchen windows – you can see the roof line from behind the mudroom (on the right) and the BBQ area (on the left).

I climbed on top of the dirt stockpile to take this picture - it's hard to fit the whole back of the house in one picture on my iphone!

I climbed on top of the dirt stockpile to take this picture – it’s hard to fit the whole back of the house in one picture on my iphone!


This week, my mom and I also did some plumbing shopping.  Actually, over the past 4 weeks my mom and I have been plumbing shopping 3 different times!  I know – I’ve been holding out on you and not telling you this yet 🙂  There’s a few reasons for that actually… Our first plumbing shopping trip was at Rosen Plumbing in Kirkland.  I really had no idea what I was getting into, but imagined that I’d be working with a sales associate, touring the showroom and picking out what I wanted.  I was really a bit under-impressed with actuality though.  We ended up standing around a showroom sink for 2 hours, flipping through manufacturer’s catalogs looking at tiny black & white pictures of different faucet options.  It truly was less than desirable and unbelievably inefficient.  In 2 hours, we didn’t even get through picking out the upstairs!  I went home and decided that it’d be best if I did lots of shopping online to figure out what I really wanted.  Two weeks later, we ended going back to Rosen, this time I was armed with a plan of the exact fixtures that I was looking to purchase.  Now, I was all ready to tell her exactly what I was looking for…the only problem?  They didn’t sell everything I was looking for.  So annoying!!

So this week, my mom and I went to Ferguson to check out the items that I couldn’t order from Rosen.  Ferguson was night and day different than Rosen!  The showroom was GORGEOUS, filled with shimmering lighting fixtures and sparkling faucets.  It was exactly what I was anticipating before we started our original search.  We ended up having an appt with a sales associate there named Hannah and she was fantastic.  She sat us down with us at her desk (novel idea, I know) and went through all of the plumbing fixtures we were looking for.  Then we toured around the showroom looking at fixtures we were interested in and ones she suggested for us.  They had hundreds for us to look at, and it does make it so much easier to see them in person, and they had ALL of the brands we were looking for.  Over the next week, Hannah’s going to send us a quote for everything that was remaining on our list, as well as all the other fixtures that we previously picked out from Rosen.  Her pricing may end up being better, and honestly, it’d be so nice to just deal with one place instead of two (plus Ferguson is conveniently close to where I work)!

Ferguson had HUNDREDS of faucets to choose from.

Ferguson had HUNDREDS of faucets to choose from.

Loved all of their lighting too!

Loved all of their lighting too!

Do you see all of those light fixtures?  I think I might just have to be back another day to look at those.  And bonus, they also sell door hardware!  So, I might have to be back a couple of times!

To give you an idea of what type of fixtures I’m looking at right now, here’s some idea boards I made for each room.  Things are still in flux, but it should be pretty close to what we’ll end up with.  And I haven’t picked out any sinks, but these were my initials after shopping online.  I’m going to wait to order sinks until I have the counter tops and cabinetry all figured out.

Master Bathroom Ideas

Master Bathroom Ideas

Powder Bathroom Ideas

Powder Bathroom Ideas

Boys' Bathroom Ideas

Boys’ Bathroom Ideas

Guest / Rec Room Bathroom Ideas

Guest / Rec Room Bathroom Ideas

Mudroom Bathroom Ideas

Mudroom Bathroom Ideas

Kitchen Ideas - although I still can't decide on a faucet.

Kitchen Ideas – although I still can’t decide on a faucet.

Laundry Room Ideas

Laundry Room Ideas

Joel's Bar Ideas

Joel’s Bar Ideas

Week 8: Basement Slab & Passed our Well Report

This week flew by fast, and it was awesome to see the progress on the house.  At the beginning of the week they were busy working on backfilling and grading around the house, and installing the plumbing lines that needed to be in the basement slab.  I was there on Tuesday morning to talk with Matt about some of the site grading and already they were testing the plumbing to ensure there wasn’t any leaks in the pipe network.  To do this they ran a garden hose from our well up to the house – how crazy is it that we’re already using the water!?!

Here's what the house looked like at the start of the week.

Here’s a panoramic of what the house looked like at the start of the week.

Most of the backfilling around the basement had been done by now, and it's pretty awesome to see the backyard grading start to take shape.

Most of the backfilling around the basement had been done by now, and it’s pretty awesome to see the backyard grading start to take shape.

Here's Cameron, standing in the garage with it backfilled part of the way - he'll never get to do that again!

Here’s Cameron, standing in the garage with it backfilled part of the way – he’ll never get to do that again!

A good amount of site grading occurred this week.  A bit more heavy equipment was on site.

A good amount of site grading occurred this week. A bit more heavy equipment was on site.

All of the plumbing that had to be run in the basement slab was installed.

All of the plumbing that had to be run in the basement slab was installed.

Speaking of that, Matt brought a sample of the well water to AMTest Laboratories for bacterial testing.  With a $10 upgrade for overnight results, on Tuesday we received the word that our water passed – no amounts of bacteria were present!  Such a relief, because that test result coupled with our well log meant that we had our source of water and the bank would be able to now allow us to draw on our construction loan.  Phew!  I also dropped off some more water to test for a complete scan which will include testing for nitrates, arsenic, ph levels, etc.  Those results will be back in two weeks.

Check out Cameron with the water coming out of the well...like a fire hose!

Check out Cameron with the water coming out of the well like a fire hose!

Our well log - finally!  This well log + bacterial test results on the water = construction funding!

Our well log – finally! This well log + bacterial test results on the water = construction funding!

Every day there seemed to be a bit of progress, but it felt like it really moved along towards the end of the week.  On Wednesday and Thursday they were leveling out the gravel in the slab, installing the vapor barrier and the rigid foam insulation over the entire slab.

Here you can see the vapor barrier (black plastic) and a bit of the rigid foam insulation which is installed underneath the concrete slab.  To meet King County's energy codes, we opted to install R-10 insulation underneath our entire slab.  That'll also help keep the boys' toes toasty in the winter.

Here you can see some of the vapor barrier (black plastic) and a bit of the rigid foam insulation which is installed underneath the concrete slab. To meet King County’s energy codes, we opted to install R-10 insulation underneath our entire slab. That’ll also help keep the boys’ toes toasty in the winter.

R-10 rigid foam insulation all stacked up before it was installed

R-10 rigid foam insulation all stacked up before it was installed

Friday was when all of the fun happened though.  Our oldest, Cameron, had a soccer tournament all day, so I took the day off of work to be the ‘soccer mom’ and drive him up to Burlington.  But we didn’t have to leave for the first game until 10:30am, so we went out to check out the construction going on – and it was so much fun.  They were pouring basement slab on Friday so we really got to see a lot of great construction going on.  My dad even met us out there (actually got there before we did) and we all hung out for a couple hours.  Cameron had a blast and a ton of questions too!

We talked to the slab guy (Jeremy) a bit and he said that because it’s been so hot (95 degrees) out, he added in a retarder to slow down the concrete curing.  If concrete cures too fast, it will crack, and even though they started pouring at 8am, it takes at least a full 24 hours for the main curing to occur, so the afternoon heat could have really done some damage.  To help it stay cool even longer, in the early afternoon they sprayed water all over the slab to saturate and cool it down.  Without slowing down the curing, the concrete will dry (and crack) before gaining it’s full tensile strength.

The concrete and pump trucks were situated up by the road with the arm of the pump truck reaching over the basement wall.

The concrete and pump trucks were situated up by the road with the arm of the pump truck reaching over the basement wall.

Here's the pump truck - you can really see how uneven and sloped our future driveway is right now!

Here’s the pump truck – you can really see how uneven and sloped our future driveway is right now!

The arm on the pump truck was so big!

The arm on the pump truck was so big!

The crew worked so quickly and so well together - each of them had different jobs and it was really neat to watch how orchestrated the pour was.  You can tell they had all been working together for a while and really knew what they were doing.  They were making it look easy - but it was definitely hard work.

The crew worked so quickly and so well together – each of them had different jobs and it was really neat to watch how orchestrated the pour was. You can tell they had all been working together for a while and really knew what they were doing. They were making it look easy – but it was definitely hard work.

My dad came out and watched the slab pour too - it was fun having him there.

My dad came out and watched the slab pour too – it was fun having him there.

The final product!   Very exciting to have it done!!!

The final product! Very exciting to have it done!!!

Quick Design Changes

At the last minute, just before the plumbing went in, I shifted the wall between the guest shower and the tech closet to increase the size of the guest shower.  Hopefully it feels roomier in there (and there’s less splashing outside of the shower since I don’t want a shower door.  Other than that, Matt shifted a wall in the boys’ bathroom because the exterior foundation wall was longer than our architect had planned, and that created a thicker exterior wall.  Instead of shrinking the boys’ shower size (which wasn’t very big to begin with), he reduced the walking space by the sinks from 3’6” to 3’0”.

Week 7: Waterproofing, Plumbing, Well Pumping & Cabinetry Shopping

It seemed like a busy week this week – we started off the week with waterproofing the exterior of the basement walls; Matt is having them use a two-part system.  The first part is a spray-on bituminous surface sealant which is sprayed directly onto the concrete walls at a thickness of 40 mil.  The second part is a dimpled drainage sheet which get secured on the outside of the spray-on sealant.  This drainage sheet acts reduces the hydrostatic pressure against the wall – therefore keeping any water in the soil away from the basement wall by giving it a direct path to flow from the finished grade to the footing drains.  In addition, geotextile fabric is secured to the drainage sheet so that water can pass through, but it keeps soils out.  The type of drainage mat they’re installing is American Wick Drain’s Site Drain Sheet 180.  This was created for commercial usage and has higher standards and compression strength as compared to it’s counterpart product for the residential use.  I guess they actually started the waterproofing on Saturday, because they were wrapped up by Tuesday this week.

Here they are adding more gravel for the base material (and for drainage underneath the basement slab).

Here they are adding more gravel for the base material (and for drainage underneath the basement slab).

The first layer of the waterproofing, a bituminous spray-on, has been applied.

The first layer of the waterproofing, a bituminous spray-on, has been applied.

This is the 2nd layer of the waterproofing, a dimpled membrane with geotextile - American Wick Sheetdrain 180

This is the 2nd layer of the waterproofing, a dimpled membrane with geotextile – American Wick Drain Sheet 180

Both our boys came with us on Wednesday to see the progress.  Here they said

Both our boys came with us on Wednesday to see the progress. Here they said, “hey mom, look at us – on top of ROCK MOUNTAIN”!!

Here's Spencer standing next to the house - he was all about getting filthy dirty today.  At one point he even kicked his sandals off.  Ick - those went back on - immediately!

Here’s Spencer standing next to the house – he was all about getting filthy dirty today. At one point he even kicked his sandals off. Ick – those went back on – immediately!

Spencer found his special 'gem' rock.  He said he put it in a safe place to find it later (in the dirt).  Good luck Spencer! ;)

Spencer found his special ‘gem’ rock. He said he put it in a safe place to find it later (in the dirt). Good luck Spencer! 😉

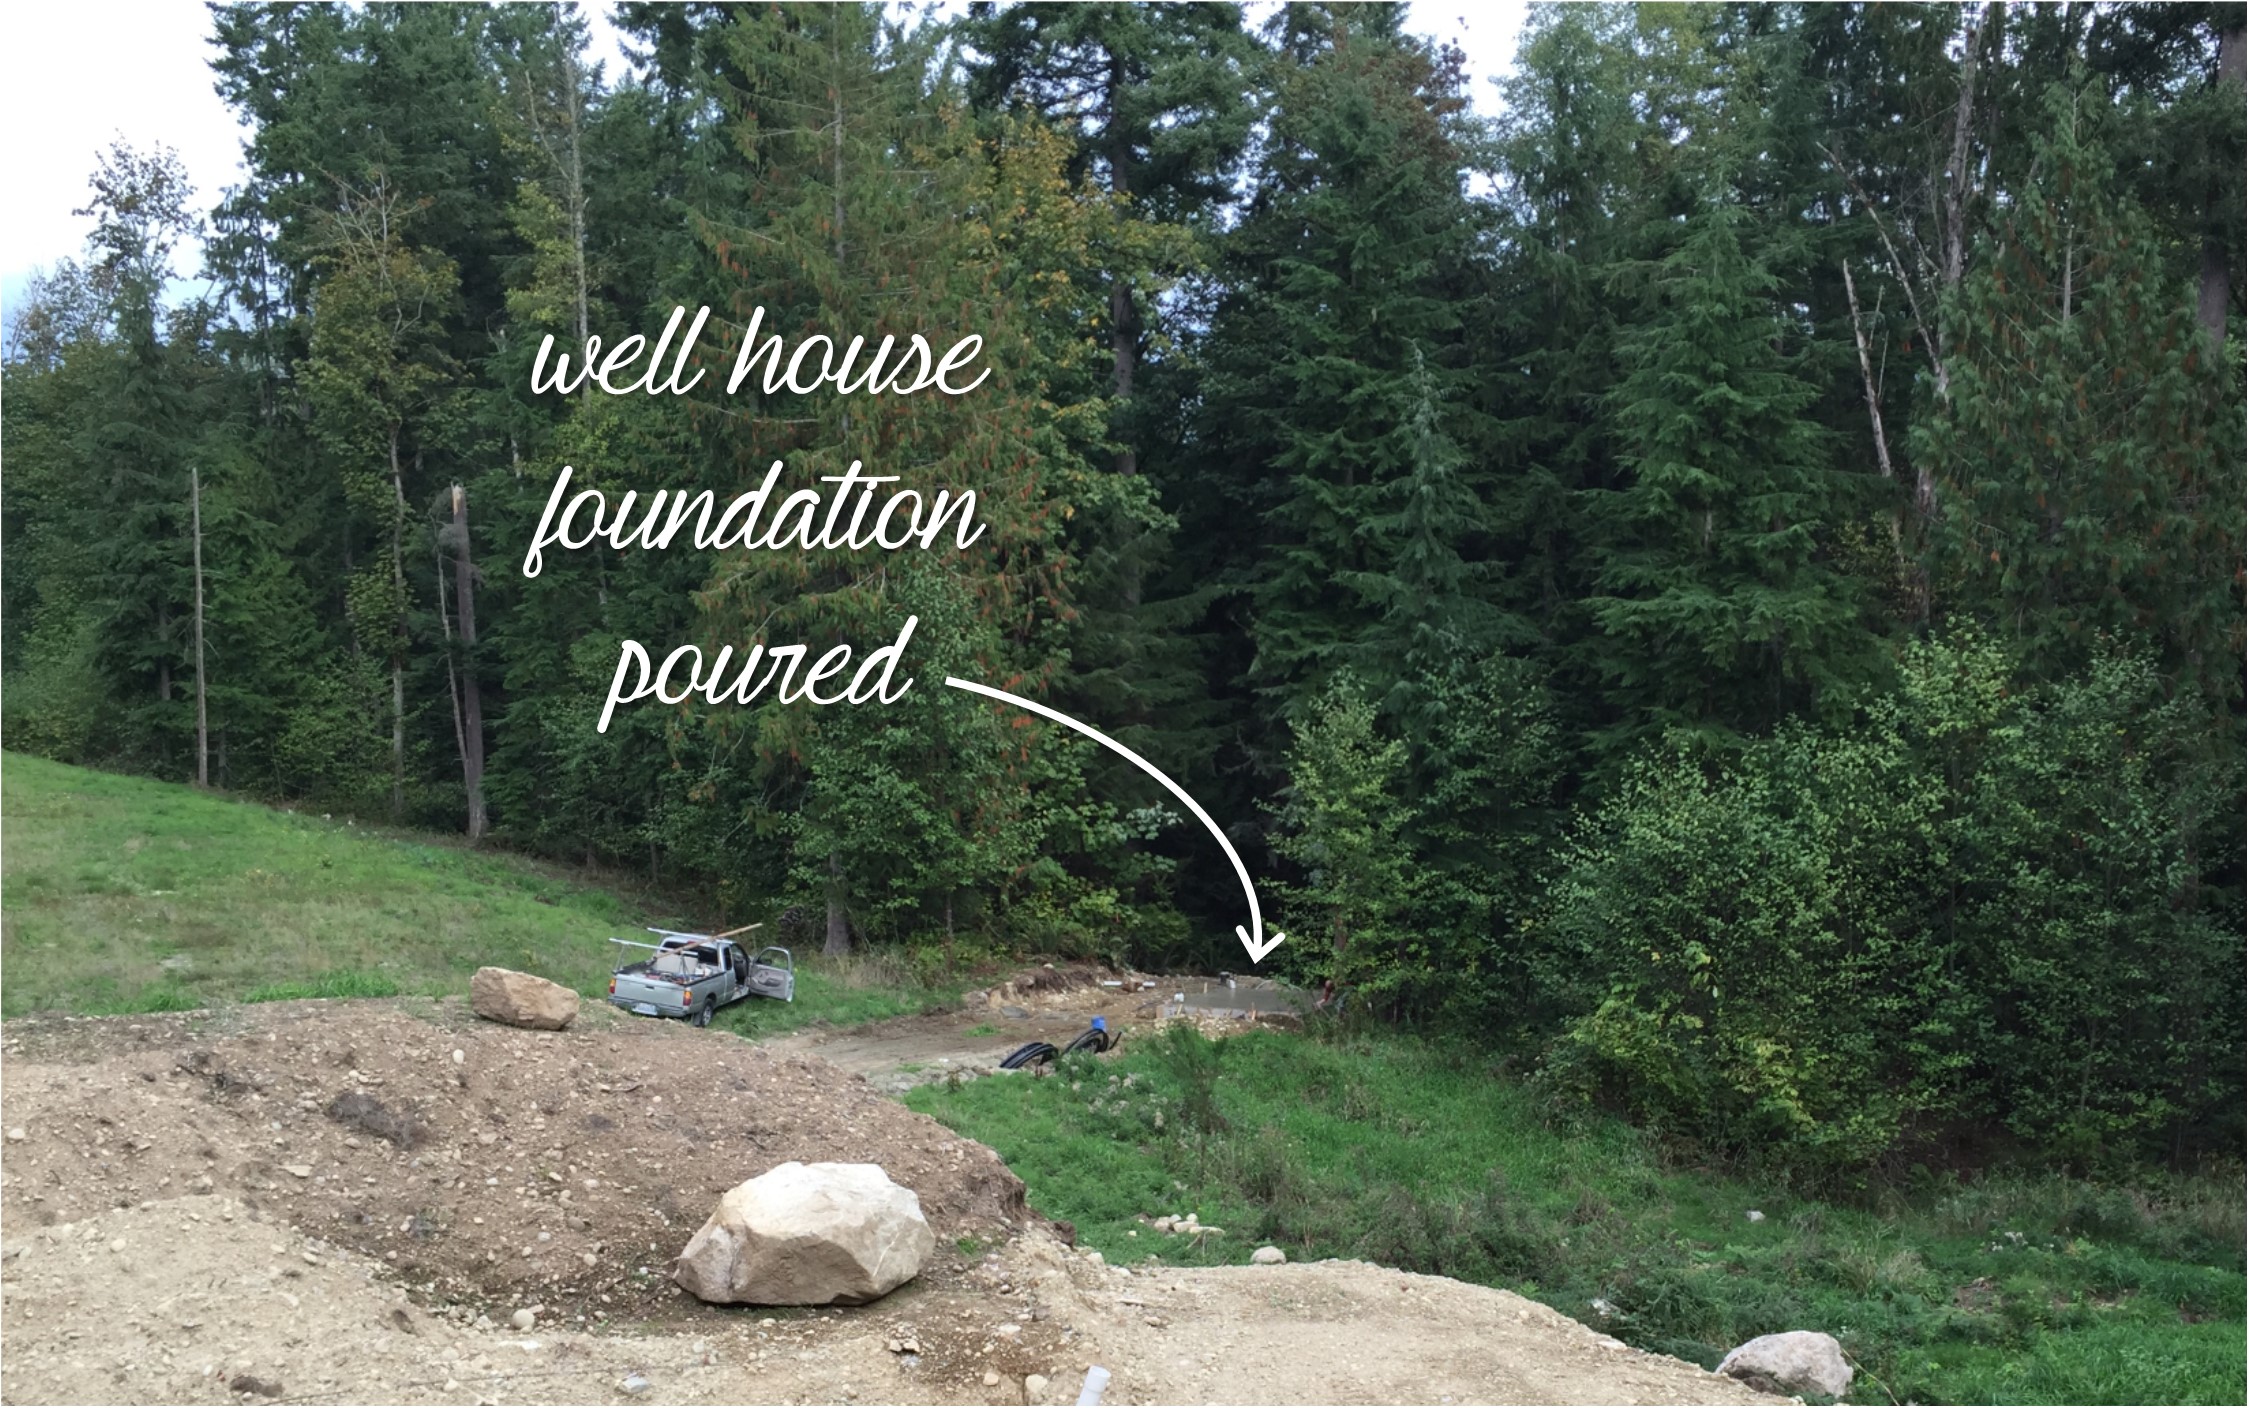
On Wednesday the well pump guy came to install the pump in our well.  He installed an 8 gallon per minute pump, as not to over pump the well, and almost instantly had crystal clear water!  I haven’t seen it running yet, but Matt said it was pretty fantastic.  Typically it takes a few hours to get as clean of water as what they were getting right off the bat.  They let the pump run for nearly an hour and the recovery rate was good on the well too – it only took a couple of minutes (maybe 3?) to get the water level back up to where it was originally.  All in all, it’s super cool that the pump is doing fantastic!  The pump guy also chlorinated the water, so after a few days (probably on Monday) we’ll be able to take a sample and send it to the lab for testing of any natural-born contaminates in the water.

The pump's been installed ...on a tree??

The pump’s been installed …on a tree??

Thursday the plumber came to install all of the piping in the basement.  Joel and I had to double-check all of the locations of the fixtures in the basement and send Matt any plan changes along with dimensions to the fixtures.  Once the plumber installs them, and the basement slab is poured – that’s where they’re staying!  Joel took the week off of work so on Thursday he was out there seeing how the build was going.  The plumber had just showed up and apparently the laborer was pretty cranky that he had to dig out the gravel base to install the plumbing pipe.  I actually would be too – still not sure I understand why the gravel was placed before the plumbing was finished…but whatever.  Joel also saw them starting to backfill the house and regrade the site.

Some of the plumbing in the basement has been started - this is a picture of the guest bath.

Some of the plumbing in the basement has been started – this is a picture of the guest bath.

New equipment showed up at the house to regrade and backfill around the house.

New equipment showed up at the house to regrade and backfill around the house.

In action - regrading the back patio area...and the plumber looking annoyed about the digging!

In action – regrading the back patio area…and the plumber looks in disbelief about all of the digging ahead of him.

The giant stockpiles of dirt were removed from our future front lawn - you can actually see the basement walls peeking out if you're looking from the road now!

The giant stockpiles of dirt were removed from our future front lawn – you can actually see the basement walls peeking out if you’re looking from the road now!

By the end of the week, here's what the progress looked like in panorama.

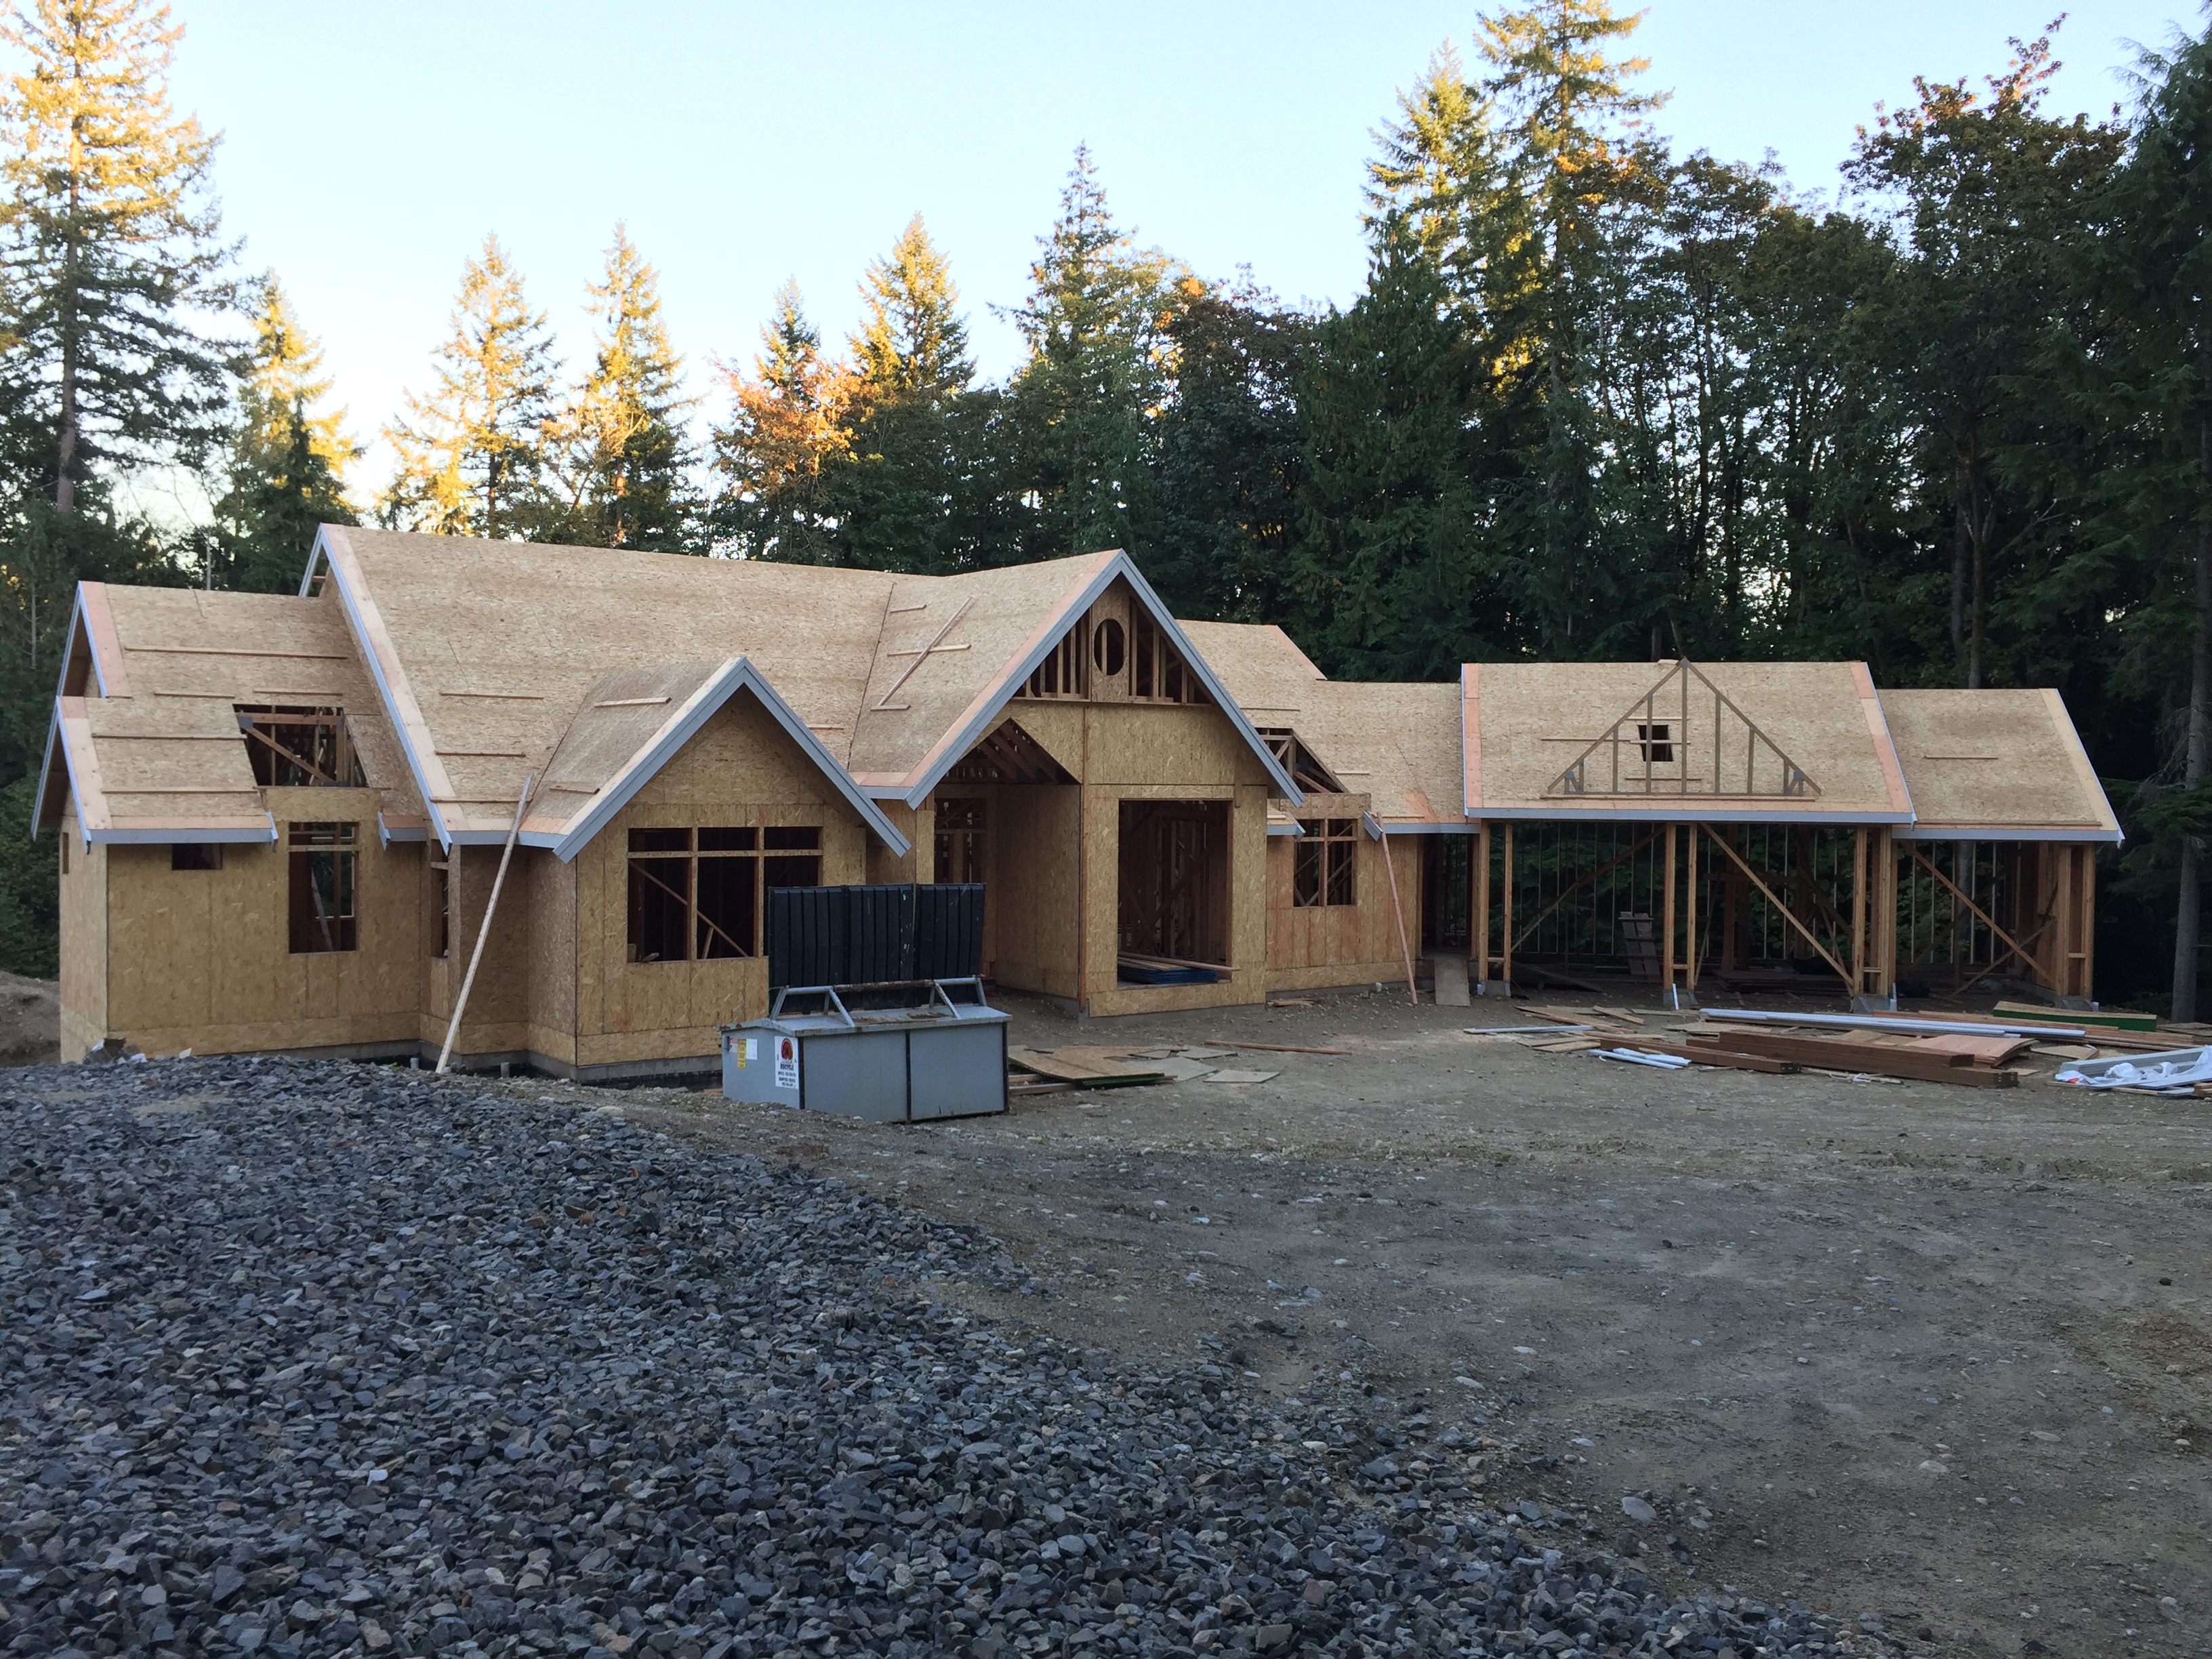
By the end of the week, here’s what the progress looked like in panorama.

Cabinets

Besides all of the construction going on, on Monday my mom and I went up to Canyon Creek Cabinetry in Monroe to look at the different cabinet styles and construction types.  It was quite a haul to go up there, but definitely worth it once you’re there.  They have an amazing show room there – with example kitchen styles ranging from craftsman, to tuscan, to modern.  Of course, I shied away from most of those, and went for the simple shaker cabinet.  The only thing different than most shaker cabinets is that I’m really liking the beaded inset cabinets.  If it’s within the budget, we’ll definitely get those.  The cabinet boxes and drawers seem like they’re made very well too – all dovetailed and you have the option for plywood boxes & drawers.  There’s a couple of standard options that I love too – the drawers are automatically soft close, and since I want painted cabinets, they can do any color paint I can come up with.  All I need to do is bring them a color swatch and they can match it.  No extra charge!  How fantastic is that?

Tons of door options to choose from at Canyon Creek Cabinetry.

Tons of door options to choose from at Canyon Creek Cabinetry.

Here's what I ultimately settled on - painted shaker style with a beaded inset.  I had a feeling this is what I was going to choose before I even went in there.  But seeing it in person just solidified it for me!

Here’s what I ultimately settled on – painted shaker style with a beaded inset. I had a feeling this is what I was going to choose before I even went in there. But seeing it in person just solidified it for me!

Here's a pretty kitchen in their show room with full overlay shaker cabinets.

Here’s a pretty kitchen in their show room with full overlay shaker cabinets.

Gray cabinets - gorgeous!  And they can color match their cabinets to any color you choose!  Awesome!!  I just might end up doing a gray for the boys' bathroom...we'll see!

Gray cabinets – gorgeous! And they can color match their cabinets to any color you choose! Awesome!! I just might end up doing a gray for the boys’ bathroom…we’ll see!

Design Update

This week we also had to think about the HVAC area in the storage room off of the boys’ play room. The storage room was designed to have the basement laundry area when you first walk in, the HVAC storage closet to the left in the little ‘alcove’ and then behind the laundry we’d have room for the boys to store all of their toys (as shown in the pic below). I swear that toy storage was my worst enemy in our old house – toys were everywhere and I was constantly trying to come up with organization solutions for all of them. It doesn’t help that the boys are 3 ½ years apart, so their toys ranged from baby toys to legos. Now it’s a bit better since Spencer is getting older, but there’s definitely a ‘mine vs. his’ attitude with their favorites – growing up with a sibling, totally understandable. The other issue is that toys are HUGE! Both boys love playing with the Imaginext toys and they’re SO BIG. In the old house, they filled up a huge armoire and that was with stacking and cramming them in. I even had to give some away so that we could house them all. Needless to say, the toy storage is a MUST for this home. Here’s a look at our original design for the space:

Original Toy Storage & HVAC room layout.

Original Toy Storage & HVAC room layout.

The problem is that we’ve now come to realize that the HVAC ‘alcove’ is too small. The size was roughly 6’ x 4.5’ and to hold two different HVAC systems (one for upstairs and one for downstairs), as well as hot water tanks (haven’t decided…might have two of those as well), it simply just won’t fit in the space. Redesign!!! And it needs to be thought through before the plumber comes in a few days to install the water lines and drains (like for the washing machine) which will be poured under the slab. The solution we came up with is shown below. We decided to move the laundry to the ‘alcove’ area, toy storage where the laundry was, and now the entire back of the storage room (6’ x 14’) is now the HVAC area – plenty big enough. I kept this walled off and with a door to not only add wall to line shelves for the toys, but also to keep the toys out of that space. That’s all I’d need is Nerf darts ending up in my furnaces…or heat pumps (still haven’t decided on that either). That’ll be a decision for a different time. 🙂

Here's the new design of the toy storage & HVAC space.  More space has been given to the HVAC equipment.

Here’s the new design of the toy storage & HVAC space. More space has been given to the HVAC equipment.

You know, it’s totally nice knowing CAD and being able to make all of these changes myself. I could see how working a lot with an architect through construction could really add up to some serious money for all the changes on the fly. I just make the change, get the dimensions and give it to Matt. Since we’re catching these things before it’s getting constructed, it’s been perfect!

Week 6: Walls and Water

On Monday this week they were out there pouring the basement walls – about 75 cubic yards of concrete! The foundation guys said that this is probably the biggest concrete job that they’ve done. How crazy is that? I think it’s probably because most homes in the northwest don’t have basements – and that’s really where you utilize a lot of concrete in homes. Otherwise, it’s typically just for the footings – no walls. Besides the walls, they also poured a couple of the footings for the deck. I wasn’t expecting that at all! My dad and his friend Steve met me out there on Monday at lunch to see the concrete being poured – it was looking like a ‘real’ jobsite out there…everyone bustling about!  By Wednesday the forms were stripped and just like that, the guys were moving on to their next project!  Friday some of the gravel was delivered and loaded into the house using a conveyor belt system.  It totally reminds me of our I-405 project with moving all that excavated dirt.  Definitely saves time and energy to do it that way!

Here's the concrete pump truck.

Here’s the concrete pump truck.

I wish the boys were here to see this - this guy has a remote control to maneuver the articulating robotic arm of the pump truck.

I wish the boys were here to see this – this guy has a remote control to maneuver the articulating robotic arm of the pump truck.

These guys have the scary work - standing on top of 10' walls, filling them with concrete and then vibrating them.  My dream job?  No thank you!

These guys have the scary work – standing on top of 10′ walls, filling them with concrete and then vibrating them. My dream job? No thank you!

The formwork has all been stripped and now you can really see the concrete walls & footings in the basement.

The formwork has all been stripped and now you can really see the concrete walls & footings in the basement.

Another view of the basement walls - this time from standing in the (future) back yard.

Another view of the basement walls – this time from standing in the (future) back yard.

By Friday they started to fill the footings with gravel using a conveyor belt system.  Reminds me of working on I-405!

By Friday they started to fill the footings with gravel using a conveyor belt system. Reminds me of working on I-405!

Well Update

Joel and I left for vacation to North Carolina to visit our friends Andy & Jackie on Wednesday morning, but by Wednesday afternoon we had received a call from Matt saying that our well guys had hit water! At 10 gallons per minute and 350 feet deep, we were ecstatic! YAY!!!  Next week we’ll have the pump guy out to check out the recovery rate and clarity.

There it is - our well!  At 10 gallons per minute and 350' deep, we're done!

There it is – our well! At 10 gallons per minute and 350′ deep, we’re done!

Design Update

This week Matt also let us know that we’ll need to start thinking more about the layout of the bar area. The plumbers are coming to install everything that will need to be in the basement slab next week, so we needed to get the configuration nailed down. The last thing we’d want is drain pipes for the sink & dishwasher in locations that weren’t ideal. Joel and I spent some time on the weekend before our trip to really measure out the bar area and make some design decisions. We looked into some appliances and their dimensions and have come up with a new bar layout.

Here's the new bar layout that we've come up with for the basement.  There might be a few things to work out after we talk to the cabinetry designers - but at least it's a good starting point!

Here’s the new bar layout that we’ve come up with for the basement. There might be a few things to work out after we talk to the cabinetry designers – but at least it’s a good starting point!

The bar area and all of the audio/video in the house are really the only thing Joel really has strong opinions on. I told him early-on those were ‘his areas’ of the house to deal with because I really don’t care as much as him. And for the rest of the house – he just goes along with most of what I want (as long as it’s within budget)! Matt has done a really good job at reminding me of our budget too, so I can’t wander too far!

Week 5: Forming Basement Walls

This week Matt’s crew continued to work on our foundation.  They started the week with only a bit of formwork and rebar up and by the end of the week our entire basement walls are formed and ready to be poured early next week.

Monday evening we went out to see the progress from the day and we were pretty excited to see the formwork for the cast-in-place basement walls up.  Cameron’s my little adventurous construction guy – he always wants to hop out of the car with me and go check things out.  Here’s a pic and you can see that Spencer isn’t around (he’s hanging out in the SUV watching a show on Joel’s phone), and even Joel’s standing off to the side.  It’s probably for the best anyhow that Spencer isn’t bumming around the site right now – there’s tons of stuff he could get hurt on – nails, rebar, concrete, formwork, etc.  Every time I ask him if he wants to check it out he says, “Is the house all built?  No?  Ok, I’ll just stay in the car.”

Cameron always wants to check the progress out with me!  Love it!

Cameron always wants to check the progress out with me! Love it!

Not Cameron though – he always wants to walk around the site and see up close what’s going on.  I love it!  And he’s always asking questions so it’s fun to explain things to him.  Bring back your 2nd grade science fair days, because on Monday evening Cameron wanted to do an experiment.  Hypothesis: when you throw them, which object (a rock or a stick) will make the biggest hole in the mud coming from the well digging?  Cameron’s conclusion: the rock makes a deeper hole and a taller “splash”, but the stick makes a shallower but wider hole.  🙂  Such a cute kiddo!

Cameron's experiment today - rock versus stick in the mud.

Cameron’s experiment today – rock versus stick in the mud.

Here’s some other pictures from throughout the week…

Rebar at sunset - whata view!

Rebar at sunset – whata view!

A quick pic inside the walls at Spencer's room.

A quick pic inside the walls at Spencer’s room.

At work it's standard to have

At work it’s standard to have “safety moments” before each meeting…had to share this one.

Here's the garage - it seems like such a waste that it's all going to be filled in with dirt - we're not having any living space beneath the garage.  Cameron wanted to make it an indoor basketball court!  There's an idea!

Here’s the garage – it seems like such a waste that it’s all going to be filled in with dirt since we’re not having any living space beneath the garage. Cameron wanted to make it an indoor basketball court…there’s an idea!

By the end of the day on Friday it's all formed and ready for the pour on Monday!

By the end of the day on Friday it’s all formed and ready for the pour on Monday!

Drilling Update

The drilling is moving along too…they started the week at 210’ deep just having passed through some major rock last week and on Monday moved on to drilling through clay.  By the end of the week, they were at 340′ and still in clay.  Judging on the other wells on our street, I think they should hit water this week.  Cross our fingers!

Design Update

This week we had a quick decision that we needed to make. Matt called to talk about the windows on the side of the garage. He needed a place to put the electrical & gas meter, and plan a place for our hose bib. The logical place would be to put them on the side of the garage, but we have windows there. The only place the electrical meter could fit would be in-between the first two windows. I guess this could have been ok, but I think that it really would have looked weird to have had the meter stuck dead center in the middle of the windows – like it was some sort of feature. Probably the easiest decision would have been to just nix the windows on the side of the garage. But since that side of the garage is angled to face the road, I really liked the idea of having windows to add curb appeal. So we decided to push the windows together to create room for the electrical meter to the right of the pair of windows. It’s the same layout as what’s set up further down on the garage wall, so it looks good – and gives Matt enough space to work and place the utilities. It’s a small change, but I believe that thinking through even the smallest of details will makes a home look so much better.

Week 4: Footings & Pour

This week they were constructing the footings for our house.  The started the week with only our surveyed corners, and by Tuesday all of the formwork and rebar was constructed!  Wednesday they poured the footings, which was super exciting to see, and by Friday they had already started on forming the walls.

Monday they made all the cuts and had it laid out.

Monday they made all the cuts and had it laid out.

Just some quick math for the garage retaining wall's footing...they must have run out of graph paper ;)

Just some quick math for the garage retaining wall’s footing…they must have run out of graph paper 😉

Joel and I took the boys to the property on Tuesday and Cameron was shocked at how small his room seemed.  Overall the house feels big, but when you’re looking at one bedroom it’s strange but it does feel small.  I think it’s because you’re out there with nothing else around you except acres of trees (and stockpiles of dirt).  So when you compare it to your surroundings, a 13’x15′ space does seem little.  I guaranteed him that it would be plenty big – and that it’s bigger than the room he’s in now which he’s even sharing with Spencer!

Here's a shot of Joel and the boys standing next to the excavation for the basement - just to give you some scale.

Here’s a shot of Joel and the boys standing next to the excavation for the basement – just to give you some scale.

By the end of the day on Tuesday the formwork was up and pretty close to being ready for concrete.

By the end of the day on Tuesday the formwork was up and pretty close to being ready for concrete.

On Wednesday they poured the footings.  From the concrete truck to the pump to our footings.

On Wednesday they poured the footings. From the concrete truck to the pump to our footings.

They reached over the excavated area to get to our footings.

They reached over the excavated area to get to our footings.

Another picture of the pump and our footings.

Another picture of them pumping the concrete for our footings.

Here's the finished product Wednesday night...we have footings!

Here’s the finished product Wednesday night…we have footings!

Check out that rebar :)

Check out that rebar 🙂

There's Cameron on Thursday - standing in his bedroom.

There’s Cameron standing in his bedroom on Thursday.

The guys even worked the Friday before the 4th of July!  Lucky for us!  And they started to form the walls up in the basement.

The guys even worked the Friday before the 4th of July! Lucky for us! And they started to form the walls up in the basement.

We did have to make one design decision this week – the ceiling height in the basement.  We designed the upstairs of the home to have a standard height of 10’ – most rooms are 10’, some are 9’, one is 11’.  The basement to have a consistent height of 10’.  However, to form the 10’ basement walls, they would have needed to use an extra row of formwork.  To save a couple thousand dollars we opted to reduce the height downstairs by about 4”.  Everyone’s guaranteed me that we won’t be able to notice a few inches off the ceiling when we’re already over 9’6”.  Let’s hope not!  In any case, maybe we’ll be able to use that extra money to upgrade something that we’ll actually notice and use.

Drilling Update

They’re still drilling for water this week.  Last week they hit a pretty big rock and the guy ended up having to drive to Eugene on Monday to pick up a new part for the drill.  And by Wednesday they had broken another part and still not completely gotten through the rock!  I told Matt to have them dig it up so we can use it for landscaping…if only it weren’t ~200-feet deep 🙂 Wednesday evening they parts of the drill home to fix them and by mid-morning on Thursday they had FINALLY gotten through the rock and were back to drilling.  So not much progress has been made in depth (only at 210-feet) on the well this week, but they did make it through the rock, so that’s good news.  Let’s hope they find water next week!

Week 3: Drilling Deeper

This week has been pretty uneventful as far as our house building is concerned.  They were supposed to have started forming the footings this week, but the only thing that has been done is some formwork and some rebar have been dropped off at the property.  Let’s hope they start Monday!

Beyond that, they keep drilling for the well.  Early in the week they found an aquifer of water at about 60 feet deep, with a rate of only 6 gallons per minute.  Being that shallow and with only gravel/sand above it, it’s considered an “unconfined aquifer” and not ideal for a well used for potable water.  In addition to that, with such a low flow, we told them to keep going.  Towards the end of the week, Matt told us that at 170’ deep they hit rock, so they needed to put on a new drill head. They’re now at 190’ down, they’re drilling through gray clay.  Hopefully once they are through the impervious clay layer they’ll find another aquifer for us.  The gray clay is fantastic because it’s impermeable and any bacteria that could come from the surface (like doggie-do) can’t pass through that layer. Thus, (when) they do find an aquifer, the gray clay protects it – ta-da… a “confined aquifer” perfect for drinking (after treatment of course)!

A confined aquifer protected by an impermeable clay layer - hoping to find water in a few days here!

A confined aquifer protected by an impermeable clay layer – hoping to find water in a few days here!

In King County, the Department of Ecology records all wells and actually has them mapped and available to the public for review on their website.  It’s a pretty easy map search to find all of the wells in your area.  In doing so, you can check out how deep you’d expect your well to be (and get an idea of the type of soils near your property).  Based on other well logs in the neighborhood (see below), I would expect to be around 350’ deep (or around there) to find our water.  Let’s hope it’s less, but only time will tell!

Other private wells on our street show that we should hope to find water between 300' and 400' deep.

Four other private wells on our street show that we should hope to find water between 300′ and 400′ deep.