This week was quite the week – Matt started off the week saying that our house was going to be a zoo and it definitely was! Since all of the trim inside has finally been painted, a bunch of the subs could begin their work.
Transoms
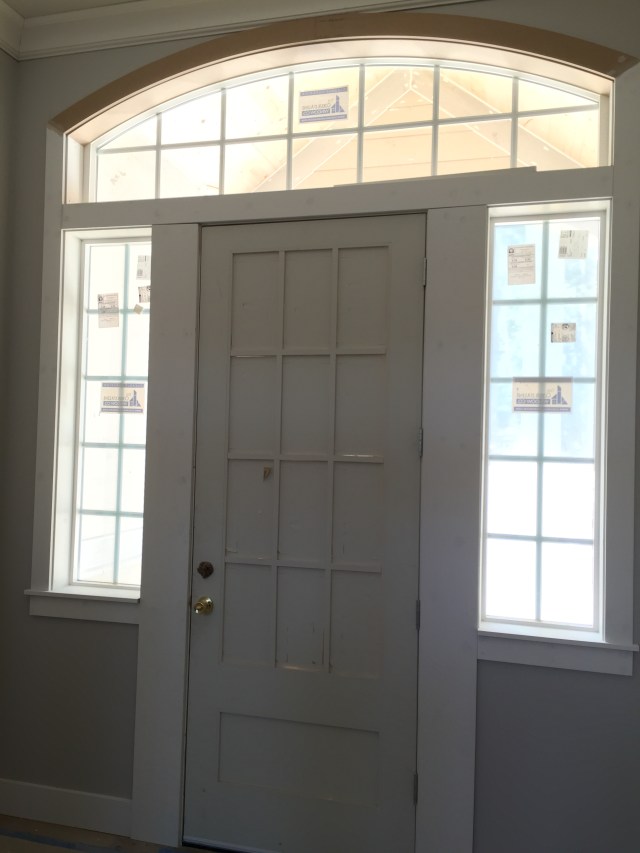
The interior transoms were completed this week which included having each piece painted, the glass installed, and putting the final trim up. They look fantastic too! I love how they help divide the rooms up but still make the rooms feel open to each other. We toured a couple of homes that had these and knew that we definitely wanted them in our house.

Transoms were added and painted this week. We contemplated buying them pre-made but now I’m glad we had them custom made on site…they look fantastic!
Plumbing
A lot (but not all) of the plumbing fixtures were installed this week and they’re looking good! My mom and I were out there on Tuesday to choose where we wanted each piece of the plumbing fixtures (the slab guys were there to drill the holes). And then the plumbers were also there to install the fixtures. My favorite faucets hands down are the ones in the kitchen. We ended up choosing Rohl’s high arc country kitchen faucet with the sidespray and the filtered water faucet. The filtered water faucet was actually cheaper to install at the sink than to have it built-in to the fridge. And this way I’m actually gaining fridge/freezer capacity and don’t have to worry about the kids spilling water on our hardwoods. Plus, it’s such a cute faucet…who could resist?!?
All of the other faucets except for the guest bath sink faucet was installed – and they still need to install most of the shower parts & pieces in the house.
-

- The kitchen faucet is by far my favorite faucet in the entire house. I love the ceramic handles and even the drinking water faucet on the left.
-

- The prep faucet in the island is just the right size. After having to reduce our sink size to fit in the cabinet depth I was worried it wouldn’t fit.
-

- Before they installed it, the faucet in the laundry room looked huge, but now that it’s in – it looks just right!
-

- We went with a stainless Brizo faucet in the bar. Eventually the air gap on the left will be switched out with the disposal button…gotta pass inspection first though.
-

- This is the faucet we chose for the master bath and the upstairs powder room.
-

- Here is one of the shower heads in the master – the rain shower. We set it extra high so that Joel would easily fit underneath it.
-

- I love the boys’ bath faucets – we went with American Standard Portsmouth Collection.
HVAC
The HVAC guys were at the house this week installing our thermostats – of which we chose NEST. I like that they have one app for everything – including smoke/carbon monoxide detectors and we’re hoping that they stay more up to date with their apps & technology as compared to the other thermostat brands. We’ve heard good and bad things about NEST but hopefully in the long run it’ll work out for us that we invested in that technology. The HVAC guys also installed all of the “trim” for the house – including the vent covers and intake vents. One word of warning – these guys had FILTHY hands – which I can now see all over our white ceilings. Next time I’d definitely ask them to wash their hands before installing all of the vents – I guess I need to teach more than my kids to do that, apparently it’s not common sense for adults yet. The HVAC guys also installed our heat pumps this week too – they’re back under the mudroom deck and since we’ve had some warm days – it’s already been tested and the cooling is definitely working!
Lighting
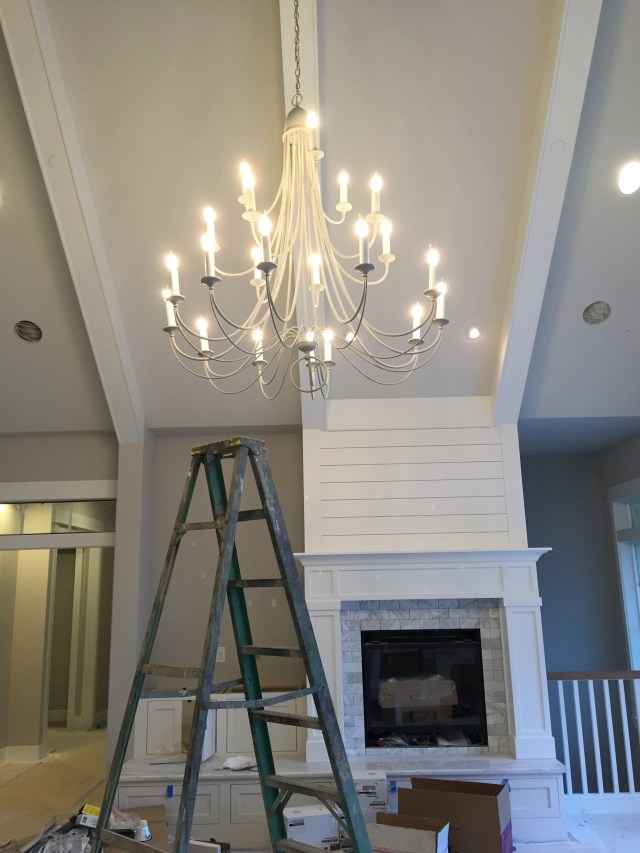
I took a couple days off this week and my mom and I headed to the house to help with the lighting – placement, heights, etc. There’s so many different lights in the house, and although I’ve labeled them the best that I can, we still needed to be on site to help with the placement. I absolutely loved picking out all of the lights for the house though. Matt said that most people would go to a lighting showroom and pick all the lights out from one person and be done with it. Of course, I did this with the plumbing and really didn’t like it – I ended up having to choose plumbing fixtures from tiny images in a catalog. So for the lighting I bought everything on my own and just had them there for the electrician to install. This meant that I could buy them from wherever I wanted and I was able to buy them when places were having sales. Most of my fixtures I acquired over the last year and did end up getting really good deals on them including some favorites from Pottery Barn and Restoration Hardware. But other ones I was able to buy vintage light fixtures and refinish and rewire to make them workable for our home.
Two “schoolhouse” light fixtures I purchased from Second Use in Seattle and they’re actually from Joel’s elementary school in Tacoma! In September of 2015 Wainwright was demolished to make way for a new intermediate school and Second Use was able to save some of the original fixtures – of which I was able to buy two of them. After a quick cleaning and re-wiring, they were ready to be installed in our mudroom bathroom and pantry!
Another one of my favorite fixtures are the pendants that we used in the downstairs bar. I ended up picking up some vintage fixtures from the Midwest on Ebay last year for $17 each! Score!! My parents helped me strip three of them down to the original brass. They were painted over and with years of dirty and grime, it took some real elbow grease to make them shine. Each one took about 2 ½ hours to strip and I was so thankful that my parents helped me with it, because it would have taken me three times as long without them!
-
- I found this fixture on craigslist last year and painted it with Annie Sloan’s Chalk Paint. I also rewired and put a different chain on it. I love the way it turned out and how it fills up the room.
-
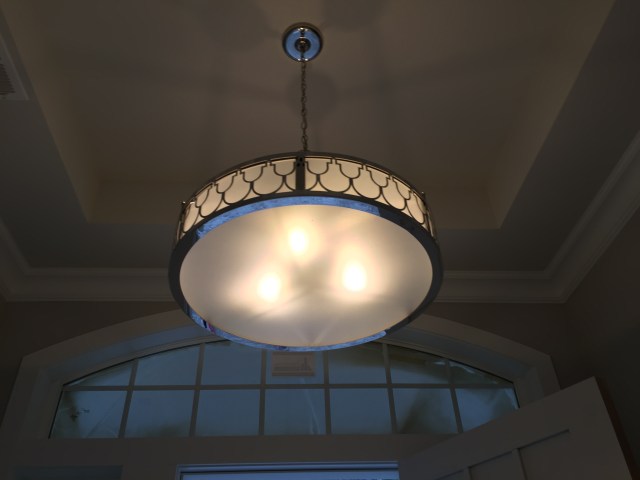
- This is the pendant in our entry – it was a little tricky to install without having all of the glass pieces fall out, but now that it’s up – it’s totally worth it.
-

- My in-laws purchased this glass fixture for a housewarming gift for us and we’ve hung it in the dining room.
-

- These are the brass fixtures we stripped and rewired for the bar downstairs. With edison bulbs they really put off such a warm light.
-

- Our capiz chandelier in the kitchen eating area has such a fun, beachy look.
-

- The ceiling fixture was from Joel’s elementary school and fits perfectly in the mudroom bathroom.
Exterior Painting
Finally the exterior of the house was also painted this week! Such a transformation to see it all white – finally! I’m glad that we waited to paint it until now otherwise it would already be showing the dirt from the construction – but boy was I getting tired of seeing the yellowish color of the siding and trim. Now that it’s all white (Sherwin Williams’ Pure White) it looks even better! It took me a while to decide on the white – I was originally going to use Benjamin Moore’s Simply White but in the end looked a little to creamy. I think SW’s Pure White ended up being the best one since it looks like a true white, but not “bright” or blue like some of the others that I tested.

The exterior painting on the house started this week. I’m loving the way it’s turning out!
We also painted samples for the door color and taped them up there to see how they looked with the overall house color. Originally I was thinking of painting it black – there’s a lot of white houses with black doors and they look phenomenal. But I wanted to be able to see the door hardware, and since all of the exterior hardware is oil rubbed bronze, that meant that I’d need a chrome front door handle to be able to see it against a black door. My friend Sarah was surprised that I was thinking of a black door (since she has one and hates it) and quickly turned me in the direction of having a gray door. Sarah helped me tons on this one and flipped through her SW color deck and suggested a handful of grays that may work well. After a quick trip to SW to see which ones she was thinking of, I chose three sample pots. And after being up on the house, ended up choosing SW’s Serious Gray – it’s the top one in the photo. I can’t wait to see what it looks like once the door is truly painted, but I think it’s the perfect one – and that the oil rubbed bronze hardware will look phenomenal with it!

We narrowed it down to three front door color choices – and ended up choosing the top one – Sherwin Williams Serious Gray